
Did you know you could launch multiple small websites from the same server and keep them isolated from each other? Plus, you could link them to multiple domain names / subdomains and apply free SSL / TLS from Let’s Encrypt.
I currently run multiple portfolio websites from one $10 / month virtual private server (VPS).
Nginx Proxy Manager does a lot of the heavy lifting by acting as a single entry point to my VPS and redirecting users to correct hosts.
I use docker to cleanly containerize websites on a single server.
Our goal in this tutorial is to launch two simple websites and access them through different subdomains.
Let’s launch the first website.
Buy a VPS
Get yourself a VPS droplet from Digital Ocean, Linode, or Vultr. For this tutorial, I’ll use a 1 CPU / 1 GB RAM VPS that costs $5/month. I’m going to install Ubuntu 20.04 as the operating system on the server.
Purchase a cheap domain name
Get yourself a cheap $0.99 domain name. It can be anything as we’re using it for the sake of this tutorial.
Access the domain name through the domain registrar and add an ‘A’ record to the domain DNS. Point the record to the IP of your VPS and set the name to a wildcard *. This means that ANY subdomain that is accessed in the browser will be pointed towards your server.

These changes can take a half hour or more to propagate.
SSH and Install Docker
SSH into your server.
Run apt update and apt install curl to update packages and install curl from the package manager.
Let’s install Docker and Docker Compose:
curl -fsSL https://get.docker.com -o get-docker.sh
sudo sh get-docker.sh
apt install docker-compose
This tutorial assumes a basic knowledge of docker and docker-compose.
Running nginx proxy manager container
We’re going to pull the Nginx Proxy Manager image and run it in a container.
The commands below create a new directory called nginx-proxy. Then we change to that directory and create an empty docker-compose.yml file. We then open the file in the nano text editor.
mkdir nginx-proxy
cd nginx-proxy
touch docker-compose.yml
nano docker-compose.yml
Let’s copy and paste the docker-compose configuration for Nginx Proxy Manager taken directly from their github readme.
---
version: '3'
services:
  app:
    image: 'jc21/nginx-proxy-manager:latest'
    restart: unless-stopped
    ports:
      - '80:80'
      - '81:81'
      - '443:443'
    environment:
      DB_MYSQL_HOST: "db"
      DB_MYSQL_PORT: 3306
      DB_MYSQL_USER: "npm"
      DB_MYSQL_PASSWORD: "npm"
      DB_MYSQL_NAME: "npm"
    volumes:
      - ./data:/data
      - ./letsencrypt:/etc/letsencrypt
  db:
    image: 'jc21/mariadb-aria:latest'
    restart: unless-stopped
    environment:
      MYSQL_ROOT_PASSWORD: 'npm'
      MYSQL_DATABASE: 'npm'
      MYSQL_USER: 'npm'
      MYSQL_PASSWORD: 'npm'
    volumes:
      - ./data/mysql:/var/lib/mysql
Save the configuration file.
If you’re going to run this in production, I suggest changing the database username / password above in the docker-compose configuration. For this tutorial, I’m leaving it as it is.
Docker-compose is going to create two containers: the application and a database in order to run Nginx Proxy Manager.
Notice that we are exposing ports 80, 81, and 443 (ssl / tls) from the application to the docker host.
Let’s run this configuration and create the two containers. We’re bringing the docker containers ‘up’ and running both of them in ‘detached’ mode.
docker-compose up -d
Let’s check the status of the running containers:
docker ps
To make it easier to see, let’s pipe the output to less with a -S flag so none of the lines are wrapped:
docker ps | less -S
We see two running containers (Press ‘q’ to exit this view):
CONTAINER ID   IMAGE                             COMMAND             CREATED              STATUS              PORTS                                                                         >
694cdad1ec02   jc21/nginx-proxy-manager:latest   "/init"             About a minute ago   Up About a minute   0.0.0.0:80-81->80-81/tcp, :::80-81->80-81/tcp, 0.0.0.0:443->443/tcp, :::443->4>
dd69467b4049   jc21/mariadb-aria:latest          "/scripts/run.sh"   About a minute ago   Up About a minute   3306/tcp
Ports 80, 81, and 443 are exposed to our host machine from the Nginx Proxy Manager container.
Setting up Nginx Proxy Manager Login
Note down your VPS IP address. Yours will be different than mine. I’ll use 137.220.37.65 in this tutorial. Use yours.
Type in 137.220.37.65 in your browser. You’ll get a page that shows:
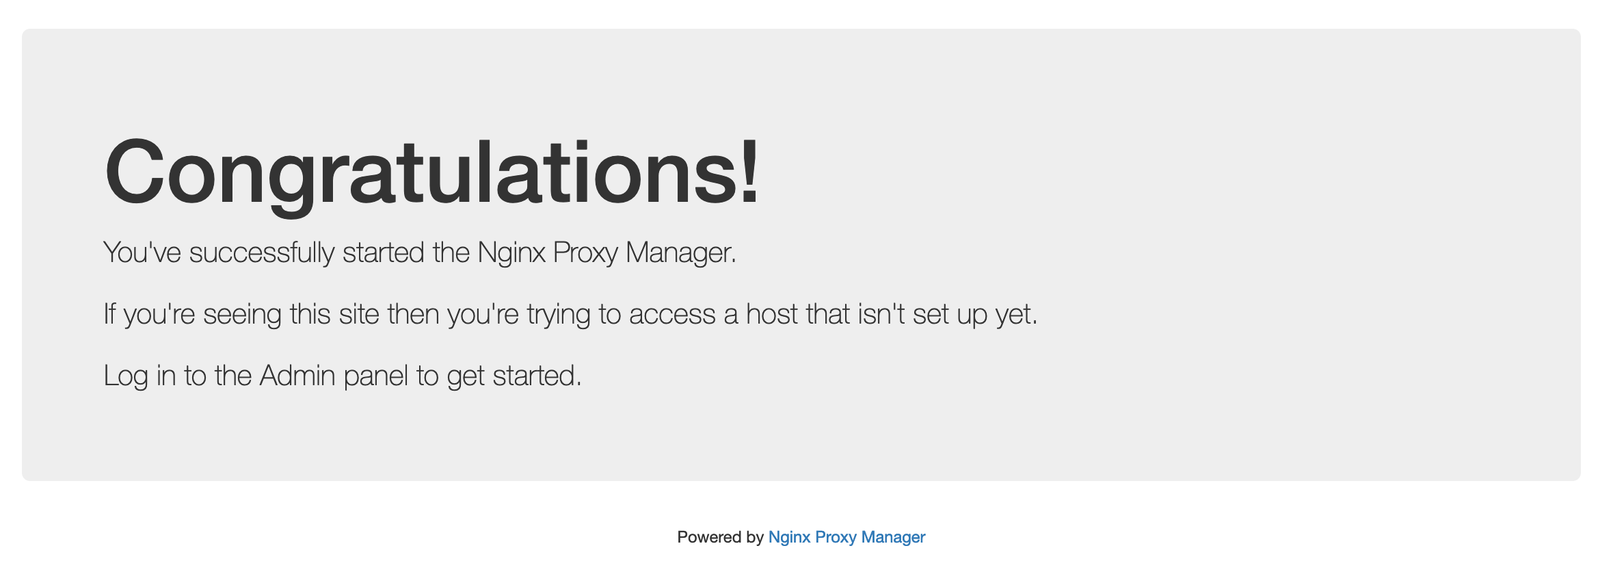
That’s the page that is exposed on port 80. When you type in any IP or website in the browser, the browser automatically adds a port 80.
137.220.37.65 typed in the browser is really 137.220.37.65:80
Note that the webpage is insecure. You’ll see a padlock with a red line through it.

The login page for Nginx Proxy Manager is located on port 81. Access 137.220.37.65:81 and a login page should appear.
Login using the default credentials:
Email: admin@example.com
Password: changeme
You’ll be asked to change your email and your password.
Try to access the domain name you registered in the browser. If all the DNS changes propagated, you should see:
Our first order of business is to set the login page as a subdomain and to secure it.
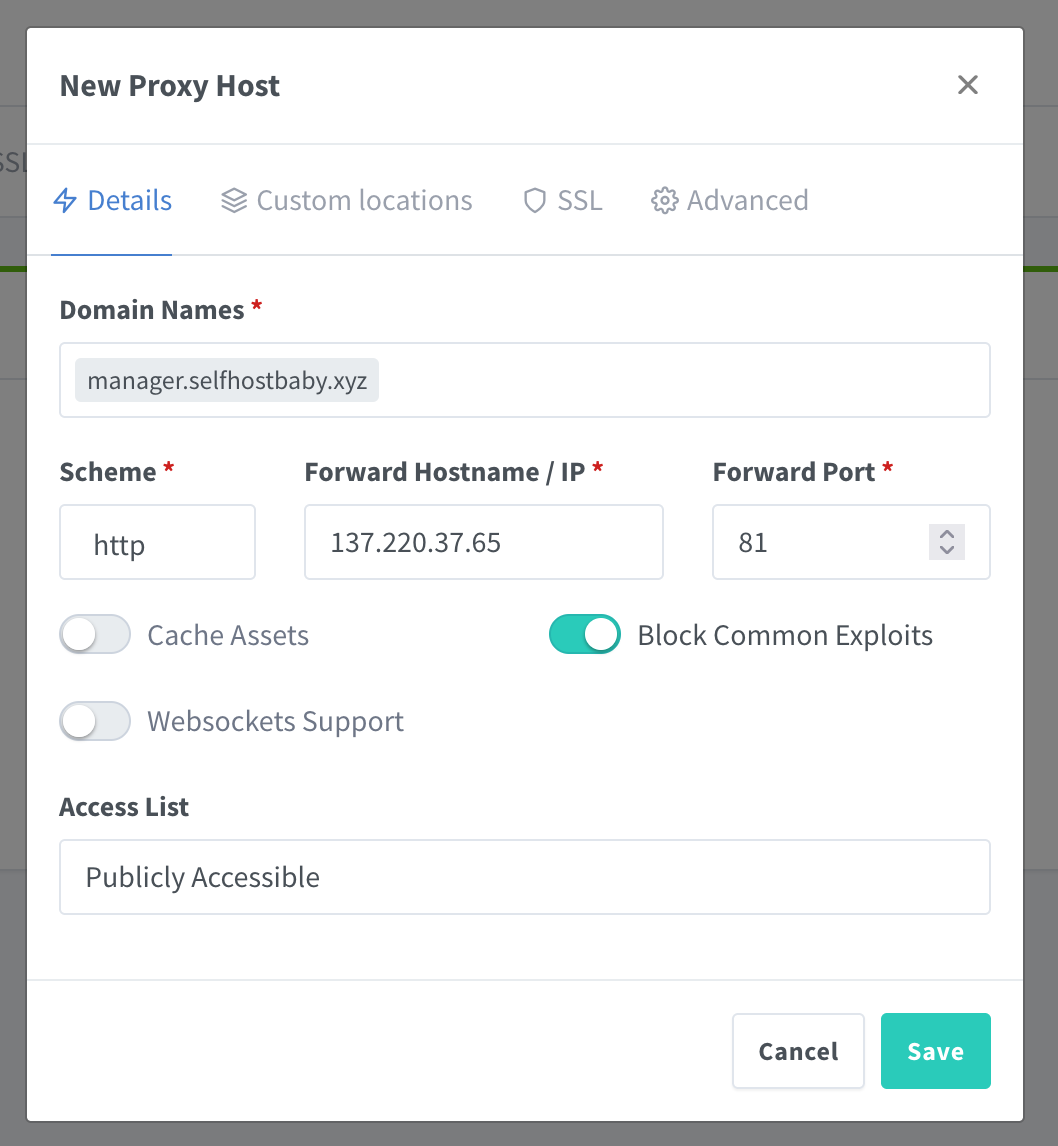
We want 137.220.37.65:81 to be accessible through manager.selfhostbaby.xyz and to be ssl / tls secure.
Click on Hosts => Proxy Hosts => Add Proxy Host

Put in the address you wish to set up in the ‘Domain Names’ field. When a user types that in, it should forward them to port 81 on the VPS IP (137.220.37.62). I’m also going to enable blocking common exploits.
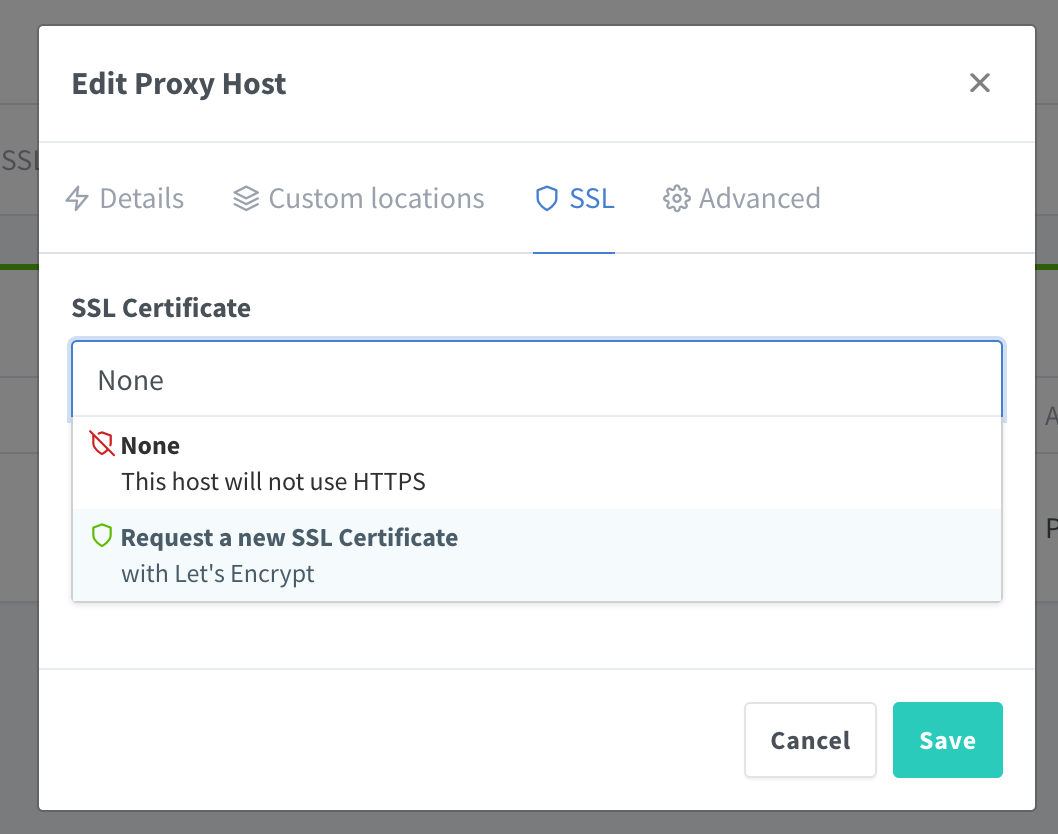
If I access manager.selfhostbaby.xyz, the login page comes up. However, the page is insecure. The padlock is not green and there’s no tls / ssl encryption.
Let’s fix that by adding automatic FREE encryption from Let’s Encrypt through Nginx Proxy Manager.
Edit the proxy host you created and access the SSL tab. Select the ‘Request a new SSL Certificate with Let’s Encrypt’ option from the dropdown.
Make sure to force the SSL:
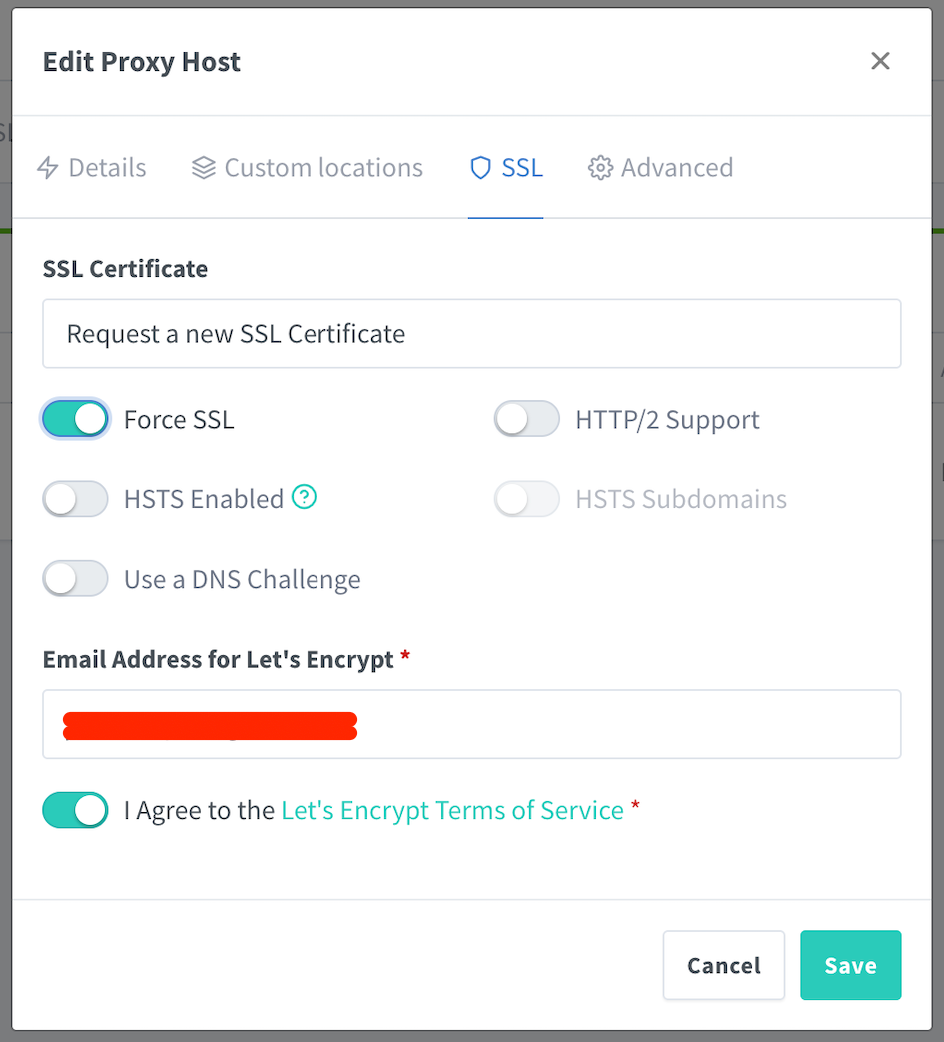
Now try accessing https://manager.selfhostbaby.xyz again. Your login page is now secure! There’s a green padlock.
This is exactly how we’ll set up another website in this remaining tutorial. We’ll isolate each website in a docker container and expose a port, similar to how port 81 was exposed to the docker host. We’ll then set up a subdomain through Nginx Proxy Manager and point it to the new port, and secure it with Let’s Encrypt.
A simple NGINX webserver
Linuxserver has an Nginx docker image that we’ll use to set up an example website.
Note that they provide a docker-compose script for setup. SSH into your docker host (your VPS).
mkdir nginx
cd nginx
touch dockercompose.yml
nano dockercompose.yml
Copy and paste this configuration into the dockercompose.yml file.
---
version: "2.1"
services:
  nginx:
    image: ghcr.io/linuxserver/nginx
    container_name: nginx
    environment:
      - PUID=1000
      - PGID=1000
      - TZ=Europe/London
    ports:
      - 4000:80
      - 4001:443
    restart: unless-stopped
Note that I’m mapping docker host port 4000 to the docker container port 80 and port 4000 to port 443. The default was 80 and 443 but those ports are already being used by the Nginx Proxy Manager and that is what we want anyways.
Now run this docker compose file and let it set this container up in a detached mode.
docker-compose up -d
Run docker ps and note down the container ID. Note that it is running.
I can access this container web server by typing in: 137.220.37.65:4000
You’ll see something like this. You’re running a web server on your VPS!

Let’s create a subdomain for it and secure it with Let’s Encrypt using Nginx Proxy Manager.
Go to https://manager.selfhostbaby.xyz and add a new proxy.
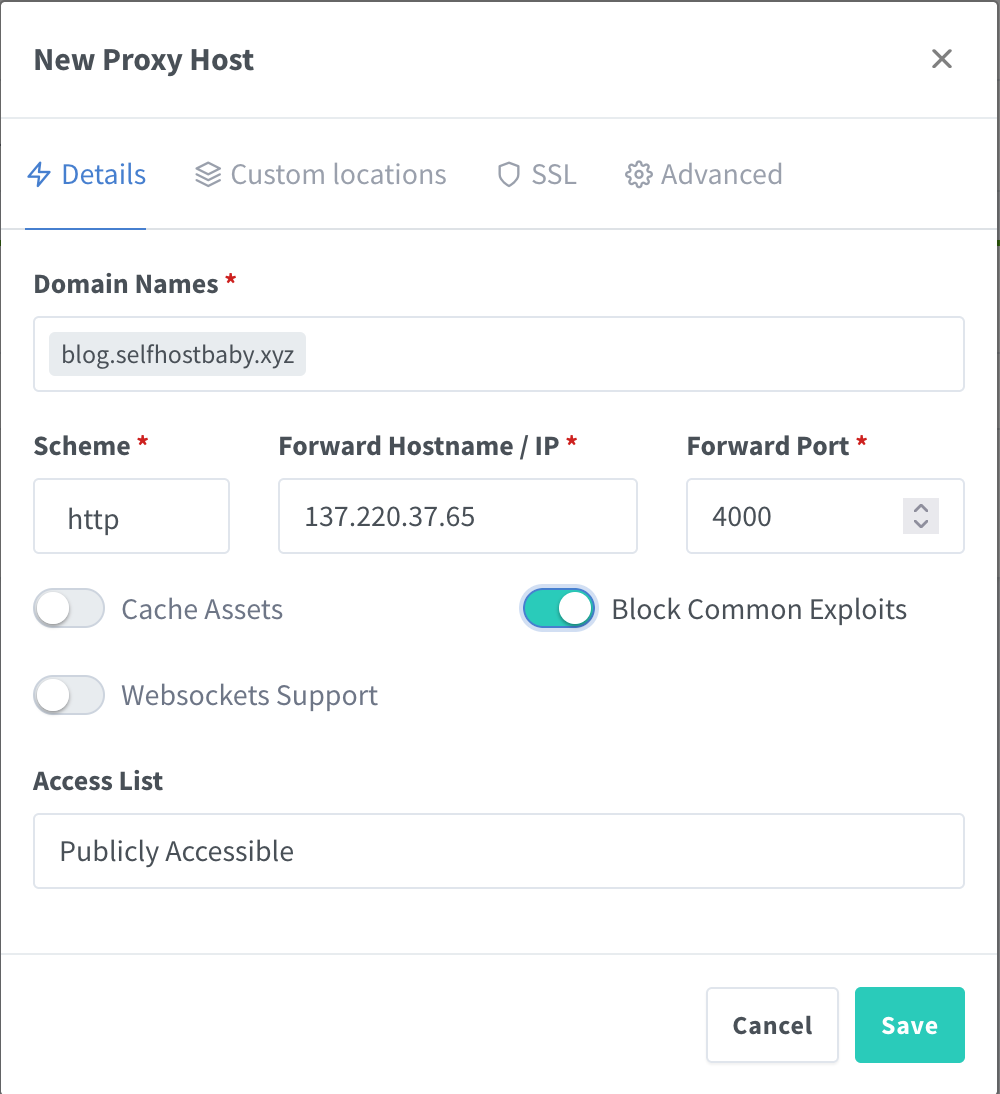
Click on the SSL tab and add the Let’s Encrypt certificate.
Access blog.selfhostbaby.xyz. The site should load up and it is also secured by Let’s Encrypt (green-pad lock).
You can repeat this process for setting up websites for any other containers you want. Heck, you can run the same nginx docker-compose file but rename the container within the docker-compose.yml to something else. That’s a brand new webserver that you’re serving on a single VPS!
You’re probably thinking that this web server message is boring and it would be nice to put your own content there instead.
The cool thing about these docker containers is that you can ‘jump’ into them.
docker exec -it nginx bash
The -i flag enters an interactive container mode. The -t enters a simulated terminal mode. -it simply combines them together. You could have written them separately like this: -i -t.
Then goes the running container name, which is nginx and then the command you want to run.
We want to run bash to access the terminal. Some flavors of linux won’t have bash installed.
In that case, use sh instead of bash.
Notice that your command line prefix changed! It’s something like this:
root@2ae3196052f3:/#
You are now inside of the nginx container, logged in as the user root and that long number is your container id.
Browse around the container. It is totally isolated from the host. If you cd config/www, that is where the webserver is serving files. It is serving index.html.
nano index.html
Go ahead and edit this file and refresh blog.selfhostbaby.xyz. It changed! You can serve a static website from this www folder.
Play around and make more running containers from the Nginx docker image. Point them to different subdomains using Nginx Proxy Manager.
The power is in your hands. You can run multiple Wordpress websites like this or other open source services. You can have them all running from one single VPS server.