
This is the article I wish I had when I started software development with Ruby.
You need to use a Ruby version manager when working with Ruby and Ruby on Rails projects to avoid gem conflicts and easily switch between Ruby versions. You have different options to choose from: RVM, rbenv, asdf.
I use RVM daily and that’s what we’ll discuss. I’m writing this post because I ran into a gem error that my colleagues weren’t running into.
The problem was that I installed gems from different projects into the same environment (gemset). Although Bundler is smart enough to avoid gem conflicts, something still went wrong.
Why use a Ruby Version Manager?
You know that you can directly install Ruby on your MacOS or Linux system. The problem is that there are multiple versions of Ruby that various projects use. For example, let’s say you download and run an open source Ruby project that requires Ruby 1.9. You install Ruby 1.9 on your MacOS.
Later, you download a project that requires Ruby 2.3. You’ll see errors if you run the 2.3 project with Ruby 1.9
So what do you do? You uninstall Ruby 1.9 and install 2.3.
Wouldn’t it be nice if you could install multiple versions of Ruby on your machine and simply switch between them? It would be even better if your machine could switch versions automatically for you.
That is what RVM will do for you.
Installing RVM
I’m using these official docs for RVM. Open your terminal and run:
\curl -sSL https://get.rvm.io | bash -s stable --ruby
Exit your terminal and enter it again. Type in rvm. You’ll get an error: rvm: command not found.
On MacOS, you want RVM to load whenever you start your terminal.
If you’re running a bash terminal, navigate to the folder that has the .bash_profile file.
Open it up and add these two lines to it and save.
[[ -s "$HOME/.profile" ]] && source "$HOME/.profile" # Load the default .profile
[[ -s "$HOME/.rvm/scripts/rvm" ]] && source "$HOME/.rvm/scripts/rvm" # Load RVM into a shell session *as a function*
Close the terminal, reopen it, and type in rvm.
You should see RVM populate a big list of usable commands.
Don’t be intimidated as it’s fairly readable. Treat it like a table of contents.
Linux installation instructions will be different. Let google guide you.
Ruby versions
Look at the list of installed Ruby versions.
rvm list

# =* ruby-3.0.0 [ x86_64
# => - current
# =* - current && default
#  * - default
Ruby-3.0.0 is installed and is selected by default. Say you want to use an older version of Ruby because your Ruby or Ruby on Rails project requires it. Let’s say you need Ruby 2.6.6.
Let’s get a list of all the ruby versions available to us from RVM:
rvm list known

# MRI Rubies
# [ruby-]1.8.6[-p420]
# [ruby-]1.8.7[-head] # security released on head
# [ruby-]1.9.1[-p431]
# [ruby-]1.9.2[-p330]
# [ruby-]1.9.3[-p551]
# [ruby-]2.0.0[-p648]
# [ruby-]2.1[.10]
# [ruby-]2.2[.10]
# [ruby-]2.3[.8]
# [ruby-]2.4[.10]
# [ruby-]2.5[.8]
# [ruby-]2.6[.6]
Bingo. There’s Ruby 2.6.6. Let’s install it: rvm install ruby-2.6.6
Check the list again.
rvm list
# => ruby-2.6.6 [ x86_64 ]
#  * ruby-3.0.0 [ x86_64 ]

# => - current
# =* - current && default
#  * - default
When RVM downloaded ruby-2.6.6, it set it as the current Ruby for this terminal session.
Try to open another terminal window and run rvm list. RVM is back to using the default ruby-3.0.0.
You can manually switch the ruby version by typing in: rvm use ruby-2.6.6.
Run rvm list and you’ll see it switches to 2.6.6!
You’re probably thinking, this is going to be a pain to manually switch Ruby versions every time in a new terminal. Don’t worry, I’ll show you how RVM can do that for you automatically. Before we get there though, let’s talk about gemsets.
Gemsets
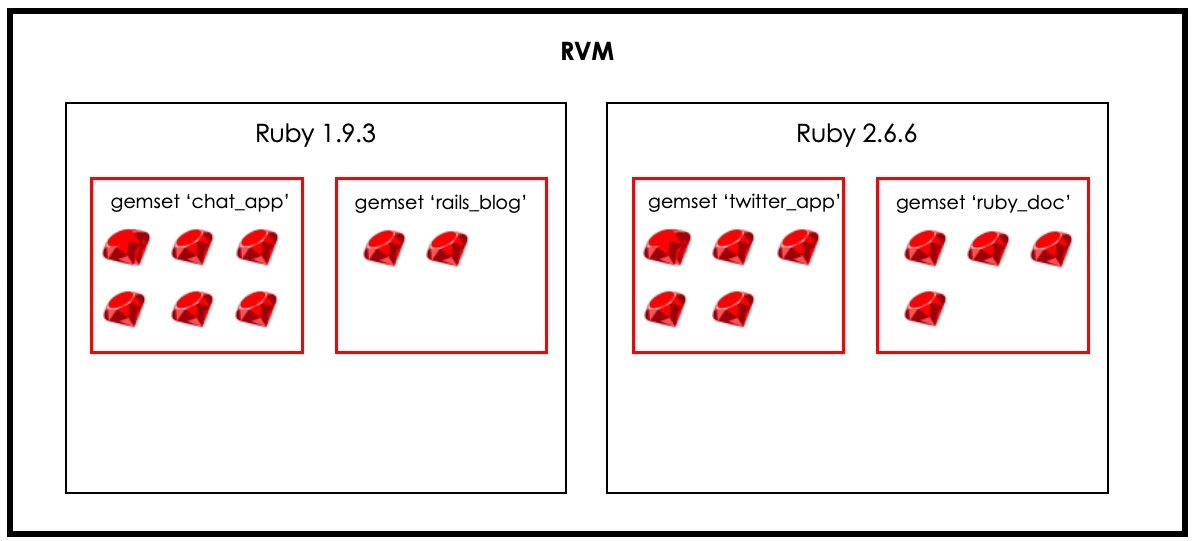
RVM uses gemsets as isolated containers. A Ruby version used through RVM can have multiple gemsets. Gemsets hold Ruby gems. The beauty of this is that you can isolate gems for different projects and avoid potential conflicts.
This is what I DIDN’T do for my projects when I started using RVM. It’s also why I got a gem error when running a Ruby on Rails project that my colleagues didn’t get.
Take a look at the hidden RVM folder that contains these ruby versions and gemsets on your MacOS system under .rvm/gems folder.
The structure loosely represents the diagram above.
I now use a separate gemset for separate Ruby and Ruby on Rails projects. That means each project has a clean isolated container (gemset) for its gems. There’s no risk of conflict.
Let’s view the current list of RVM gemsets:
rvm gemset list
# => (default)
#   global
Let’s create a new gemset. But how do we do that?
rvm gemset

# Usage:
#   rvm gemset [action]
#   rvm --force gemset [action]

# Actions: copy, create, delete (alias: remove), dir, empty, export, gemdir, globalcache, import, install, list, list_all, name, pristine, rename (alias: move), unpack, update, use
# Look at that! RVM tells you the kind of actions you can take on a gemset. Let's use the create action here.
Let’s create a gemset container called chat_app.
rvm gemset create chat_app
# ruby-2.6.6 - #gemset created /usr/local/rvm/gems/ruby-2.6.6@chat_app

rvm gemset list # note that chat_app was added to the gemset list.

# => (default)
#    chat_app
#    global
Note that it’s still using the default gemset. We want to use the chat_app gemset.
Let’s switch over: rvm gemset use chat_app.
Confirm the switch by running rvm gemset list.
If you close the terminal and reopen it again, your default selections will be lost because you changed your terminal session. Let’s fix that.
Generating .ruby-version and .ruby-gemset files
Navigate to the root folder of your Ruby or Ruby on Rails project in the terminal.
Before you type in the command below, make sure you install the ruby version you want to use (2.6.6) with RVM and you create a gemset called chat_app.
Now run:
rvm --ruby-version use 2.6.6@chat_app
RVM generates two files in your root directory: .ruby-gemset and .ruby-version.
Open them and look inside.
RVM is storing the ruby version and the gemset name automatically for you with this project. You can now close down your terminal and whenever you open a new terminal, RVM will automatically ensure Ruby 2.6.6 is used with the chat_app gemset.
This means you can switch between projects and have RVM automatically set the correct Ruby version and select the correct gemset.
Gemsets duplicate gems
There are folks that say gemsets cause gem duplication and take up unnecessary space on your computer. So what?
Storage is cheap. If duplication means taking up an extra gigabyte of space over dozens of gemsets, so be it.
I can always delete the gemset( rvm gemset delete gemset_name ) I’m not using and restore space.